ScaledYOLOv43 is the best object detection model currently available. But how does it perform on out-of-dataset images? In this blog, we will test how well the model generalizes by running it through the CityPersons1,2 dataset using pre-trained model weights. For this demonstration, we will use Google Colab as it provides free GPU access to notebooks, and is well, free. Let’s get started.
Download Citypersons dataset - Note that you need to create an account to download the dataset.
Download ScaledYOLOv4-p5 pretrained checkpoint
Notebook version of the following experiment
Installing Scaled YOLOv4 dependencies
Once inside the notebook, change the runtime to GPU.
As Colab provides many preinstalled packages like PyTorch, we just need to install a few additional dependencies along with the main model code.
First, clone the Scaled-YOLOv4 repo and switch over to the yolov4-large branch.
# clone Scaled_YOLOv4
!git clone https://github.com/Mindkosh/ScaledYOLOv4.git # clone repo
%cd /content/ScaledYOLOv4/
#checkout the yolov4-large branch
!git checkout yolov4-large
Let’s check if the GPU is running properly.
import torch
print('Using torch %s %s' % (torch.__version__, torch.cuda.get_device_properties(0) if torch.cuda.is_available() else 'CPU'))
Next we'll install mish-cuda in order to run the mish activation functions quickly on our notebook's GPU. After that, we need to update to the latest pyYaml version as colab offers an older one by default.
# install mish activation function for Cuda
%cd /content/
!git clone https://github.com/JunnYu/mish-cuda
%cd mish-cuda
!python setup.py build install
!pip install -U PyYAML
Looks Good! We are done with the dependencies. Next we will download the model weights.
Downloading Model Weights
We will will use pretrained model weights for our testing. We will do this by using the ‘gdown’ command and passing it our Google Drive ID to download the pre-trained model weights.
First, navigate to the ScaledYOLOv4 directory and create a new weights folder for storing the pre-trained model weights.
%cd /content/ScaledYOLOv4/ #path to the ScaledYOLOv4 directory
%mkdir weights
%cd weights
Now, lets download the weights.
!gdown --id 1aXZZE999sHMP1gev60XhNChtHPRMH3Fz #yolov4-p5.pt
!gdown --id 15CL05ZufFk2krbRS993fqlG40Wb0HTyr #yolov4-p5_.pt
!gdown --id 1aB7May8oPYzBqbgwYSZHuATPXyxh9xnf #yolov4-p6.pt
!gdown --id 1Q8oG3lBVVoS0-UwNOBsDsPkq9VKs9UcC #yolov4-p6_.pt
!gdown --id 18fGlzgEJTkUEiBG4hW00pyedJKNnYLP3 #yolov4-p7.pt
We have six model weights trained at different checkpoints with yolov4-p7.pt being the best among them. Now, let’s move to the next step.
Preparing the Custom Dataset
To test the object detection model, we will will use the CityPerson dataset, a subset of the CityScapes dataset1,2 - a widely used dataset obtained from different cities worldwide. For our use case, we will use a small subset of the original dataset consisting of three cities - Frankfurt, Lindau, and Munster. We have already prepared the images and labels in YOLO format, so you don’t have to!
To download the citypersons dataset from Kaggle, we will use the package ‘opendatasets’. The following line of code shows how this can be done.
!pip install opendatasets
import opendatasets as od
download_url = ‘https://www.kaggle.com/meviole/cityperson-validation’
od.download(download_url, '.')
Note: To download the dataset from Kaggle, you will need an API token that can be created from your Kaggle account. Click on the profile icon on the top right of the window --> Click on ‘Account’ → ‘Create new API Token’. Enter your username and this API key, after you execute the above lines of code.
Creating a Custom Yaml file
YOLOv4 uses a Yaml file to store the dataset location, the number of classes, and the names of classes for training and testing. Since we are using a custom dataset, we need to create a new YAML file for testing. To do this, navigate to the data folder in the ScaledYOLOv4 directory and create a ‘cityperson.yaml’ file.
%cd /content/ScaledYOLOv4/data/
!touch cityperson.yaml
%cd /content/ScaledYOLOv4/data/
And enter the following lines.
%%writefile cityperson.yaml
val: ../cityperson-validation/cityperson/images/
nc: 1
names: ['person']
The first line specifies the validation image location. The second line indicates the number of classes in the labels file and the third line indicates the names of classes in the labels file.
That’s it. We are ready to test the model on the cityperson dataset.
Testing the Model
Navigate to the ScaledYOLOv4 directory. You will notice a test.py file. This file can be used to run validation and test processes. Run the below line of code to kick-start the validation.
!python test.py --conf 0.001 --batch 9 --device 0 --data customdata.yaml --weights weights/yolov4-p7.pt --single-cls
This might take a few seconds to a few minutes depending on your GPU. Once run, it should produce an output similar to the following.
Namespace(augment=False, batch_size=9, conf_thres=0.001, data='customdata.yaml', device='0', img_size=640, iou_thres=0.65, merge=False, save_json=False, save_txt=False, single_cls=True, task='val', verbose=False, weights=['weights/yolov4-p7.pt'])
Using CUDA device0 _CudaDeviceProperties(name='Tesla T4', total_memory=15109MB)
Fusing layers... Model Summary: 503 layers, 2.87475e+08 parameters, 2.7862e+08 gradients
Scanning images: 100% 500/500 [00:01<00:00, 320.34it/s]
Scanning labels ../cityperson-validation/cityperson/labels.cache (441 found, 0 missing, 59 empty, 0 duplicate, for 500 images): 100% 500/500 [00:00<00:00, 15430.67it/s
Class Images Targets P R mAP@.5 mAP@.5:.95: 100% 56/56 [00:30<00:00, 1.85it/s] all 500 4.16e+03 0.489 0.448 0.433 0.19
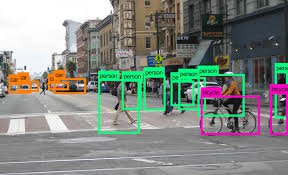
Speed: 26.2/2.9/29.2 ms inference/NMS/total per 640x640 image at batch-size 9If you run the above code, you will find a test_batch0 image and a test_batch0_pred image in the ScaledYOLOv4 directory. Let’s look into these.
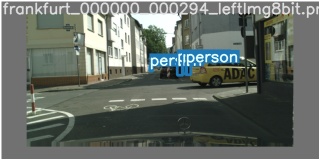
The above is our labeled image. As you can see, there is only one label - ‘person’. Now, let’s look into the predicted image.
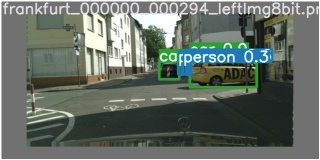
We can notice a few things from these images:
- The object detection itself is pretty good. It was able to draw bounding-boxes around 2 out of 3 people and around both the cars.
- It mis-classified one car as a person.
Quantitatively, the Precision and Recall are 0.489 and 0.448 respectively. To put this into perspective, in our experiments on the COCO Validation 2017 set, ScaledYOLOv4 scored 0.47 on precision and 0.85 on recall for “person” class, and 0.397 on precision and 0.75 on recall, averaged over all 80 classes. So while there is a sharp decline in recall, precision actually received a minor boost. We chose the CityPersons dataset specifically because its perspective differs from the images usually found in the COCO dataset on which the model is trained. Considering this, these results are actually not that bad.
But are there ways to improve them? There certainly are. The most straightforward is to simply train the model on your custom data. If you want to use pre-trained weights, then the other solution can be to freeze all-but-final few layers, reduce the classification to “person” and “not_person” and train this custom setup on your data. A final solution to improve the results further is to improve your training and validation labels.
We at Mindkosh are always looking for ways to improve the quality of annotated data, and to do all of it at blazing fast speeds. Keep an eye out for our blogs to get a sneak peek into how we work our magic!
References